Sunday, October 28, 2007

How to improve digital camera photos

When i first got my camera. I took it out to different places. I had a bunch of shots at each place, go home, pop the CF card in the reader and start wondering why all my pictures doesn't look like any of those that I saw on the net. The easy answer for that is my camera isnt as good; but the most convincing answer for that is my technique is simply not good enough. Through out a many miserable failures, I gathered these tips that i have learnt to improve the quality of my photos.

1. Use the tripod: I know this sounds silly. The tripod is such a hassle to carry around; but trust me, you'll be kicking yourself when you need one and its not there. With non IS (image stablizer) lens, this should be the item you always need, because even a slight shake will ruin the picture (usually any over 1/60). This is also true with IS lens when shutter speed is higher than 1 sec.
2. Change your camera variables: Im refering to ISO, Aperature, shutter speed, image size, zoom , etc ...

  • ISO : When its too dark ,increasing your ISO should be a good idea. An alternative for that when you have a tripod is, set your ISO normal and set shutter speed higher so your camera can absorb more light.

  • Shutter speed: shutter speed is used as far as exposure is in concern. When there's not enough light, slower shutter speed will compensate the condition. The shutter speeds and apertures are interchangeable.
  • Image size : I usually set my image size at large and RAW. Larger image size contains more detail than smaller one. In Addition , it will give your more option when it comes to printing out the image. Large size image -> good in large print, excellent is smaller print; Small size image -> good on small print, and you'll be wasting your money if you decide to boom it up.

  • Aperature : Aperature number is important too. Setting it higher (lower amount of light goes in to your sensor) will increase the detail of your picture greatly. Its the same with human pupil except that the lens won dialate it along with the condition, so you just gotta do this yourself. Tips: When taking night photo, as you set your aperature high, street light start to have the star shape.

    Picture with low Aperature value. (Click on the image for larger version)

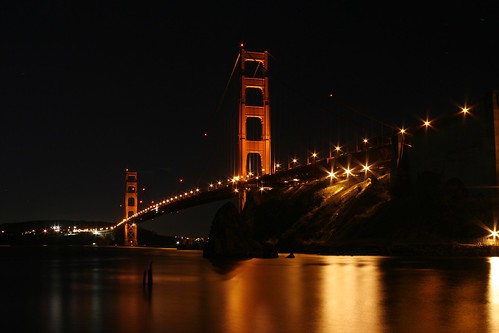
    Same angle with higher aperature value. Notice the star shape light and better detail(Click on the image for larger version)


  • Zoom: Dont waste your pixel on the pointless background. Zoom in and focus on the thing you want a shot at. That will greatly increase the quality of your picture.


3. How many is enough : Once you have a idea of what you want in the picture. Take at least 3 shots, each with different variable setting. This way you can compare and evaluate each picture in the set. Also this is a good practice for beginner like me.
4. "Wait ! But what if I tried all the above and it still looks bad ? " : There's something call photoshop my friend! When all efforts fail to overcome the condition, you might need a little help from software. Picassa is a great free program for this.

That's all i got, I hope it helps. Im still in the learning process, I'll post up more tricks/tips i learn in later post. Have fun capturing the moment.

Opinions and corrections are deeply appreciated.

Saturday, October 27, 2007

Yosemite in Autumn


Yosemite is so colorful in autumn. Too bad ... it was cloudy so it doesnt look as good as it was and the detail wasn't that clear.

Here are some other pictures i took there:

The leaves are beautiful ...


So is the road.

Tuesday, October 23, 2007

Long exposure photography technique

I would say long exposure is one of my favourite technique. In fact, that was the whole reason for me to give photography a try. Couple months ago, we went to Yosemite to observe moonbow. I wont go into the detail of that but you can click on that link and read it on wiki. My friend used his camera to take the picture of the moonbow at the bottom of Yosemite waterfall; the picture looked phenomenal to me at the time. The sky was blue, the waterfall was silky white; and the trees were amazingly green (view this picture at trieuvan). I found this surprising because we were in the middle of Yosemite valley at 2 AM in the morning and the only light source we had at the time was the moon.


After many months debating on whether i should buy a camera or not, finally i got one. I bought it from the same friend i mentioned above. With all the excitement, I took it out for some night photography. As you expected, It was a miserable failure. My pictures were blurry. The detail wasn't sharp enough. And most of them were crooked.


Here are the bad example so you can learn my from my mistake:


- Over exposed:


- Shaky condition:


So I asked around, researched on the net and I finally had a good shot. Here are a list of things you need to prepare for a good night shot. Please keep in mind that i just started a week ago, so im not quite the expert yet. Feel free to correct my technique, pointing out thing that I've missed.


Things you will need:

  • Tripod ( the sturdier, the better)

  • A camera with long exposure mode (any thing from 10 sec or more will do)

  • An awesome place to take picture at.

  • A weapon of some sort to protect your camera, and yourself of course, in case someone tries to rob you ..... jk ... well lets just change point #3 to "An awesome and safe place".


Step for an awesome picture:

  • Find a spot where the ground is less likely to shake, and im not talking about earthquake here. If you take a picture of a pier dock, it will shake a little. And that is bad enough to ruin your picture. Sometime wind will screw it up too.

  • Set up your tripod. Aim your camera at the view you want to take the picture.

  • Choose a shutter speed depends on how dark your place is.

  • Set your ISO to low. I usually put it at 100 ISO. Well, how low you should set your ISO is debatable. If you plan to set your shutter speed higher , the lower your ISO should be to avoid over exposure. Also, if the place you take the picture at is shaky, or windy. It might be helpful to set ISO higher and lower shutter speed. This will help a little , it doesnt greatly improve the quality of the picture in my experience.

  • Choose either Manual Focus , or Automatic Focus if you dont really trust your eyes. Sometime you will need to choose manual focus because the camera cant focus in AF mode when it is too dark. I feel like im missing out something in this point. So please help me out if you have some good tips.

  • Choose Aperature value. Aperature will allow how much light go into the lens, usually i set it at F7.1 - 11. Higher value means lower amount of light, which also means you might want to set the shutter speed higher. Adjust this value accordingly.

  • Click, wait, then check out your picture. Adjust the shutter speed, ISO, or aperature value according to your satisfaction with the picture. If too bright, you might want to lower ISO, or have shorter exposure. If the picture is too blurry, set your aperature value higher (lower amount of light gets in -> more detailed picture). If the blur looks like it's because of the shaky ground, then you might want to find another spot, or hang something heavy at the bottom of your tripod.


Here is the picture of the Golden Gate at night. I took this picture with F.11 , ISO 100, 30 sec exposure.


I hope these are good tips, and please feel free to correct me and share your own technique/tips.


Hoang

Golden Gate at night


Update: check out my Long exposure photography technique post for tips/technique to take night pictures